10/29/11

Lucky Lady Bug Cake

Today is August 1st, 2013. It's been a while since I've blogged... [I've post dated this when the cake was actually made... which was... ummm... pretty much 2 years ago!]

I made this tiered lady bug cake for a good friend's niece's very 1st birthday. I also made a lady bug smash cake for the birthday girl. If memory serves me right, she was a little freaked out about the texture of the crusted buttercream but was able to dig in with a little encouragement!

I started with a client sketch based off a lot of similar cake themes.


 I then went on to make and shape the daisies.


The lady bugs were made from red fondant and black edible ink markers.


I put the two together and let them dry in a flower former.

 I didn't take pictures of the rest of the process but I made two round tiers and used a Wilton sport ball pan to make the lady bug cake topper and smash cake. I guess I didn't take very good end product photos either... I'll just share what I have and you'll get the idea. I made the lady bug antennae by putting black fondant balls on the end of Chef Duff wire I bought at Michael's.


The smash cake was one half of the Wilton sports ball pan. I tinted some buttercream red and piped stars over most of the body. The face and spots were layered on with black fondant.

I "glued" the daisies on with a little bit of water but they were a bit heavy and slid off the cake a few times. I'd recommend making a fondant glue by mixing a tiny bit of fondant with some water to get a better hold.

Here's the lucky lady at the party.

Crazy that little Sofia is going to be 3 soon and I'm just getting around to sharing this!

10/14/11

Incredible Edible Hulk

Although the Hulk is incredibly large, this cake is incredibly tiny... yet incredibly edible.
 
His body is only 6" round and his head is a mere 4" round cake bump. He is covered in a mean shade of green fondant though. 
 
 
To complete this hulk's intimidating look, I added some shaggy black hair and a torn up loin-cloth-belt-type thing which is supposed to represent his shorts. A simple mean expression was what he needed next.
 
 
Yes, he is pretty small but he is certainly mean and incredibly green.

10/13/11

Hello Kitty Cupcake Toppers

I hardly even remember making these Hello Kitty cupcake toppers but I took photos of them, so here they are.


They're similar to these kittehs I had made previously with the only difference being that I swept on some shimmery luster dust for this group.


I don't remember who I made these for... I vaguely remember someone really tall picking them up from me at my office... whoever they went to, I hope they were enjoyed!
 

10/7/11

Glazed Skull Spice Cakes

I had used this Wilton mini skull cakelet pan before here but I couldn't help using it again, they just bake up so nicely. This time I used a spice cake mix to create the skull cakes. The features show up really well when you coat the pan with a non-stick spray like Wilton's Bake Easy.


I didn't want to ice them in buttercream and then cover them in fondant or make a batch of dreaded ganache so I came upon the idea of making a simple sugar glaze. Boring, right? I decided to spice up "boring" by adding some Tyler's Sweet Revenge cinnamon pear butter I had bought at a pumpkin festival in Connecticut to the powdered sugar and water mixture. The texture was interesting. A little lumpy. I little bubbly. Just the right amount of creepy.

I poured on the sweet glaze concoction until the skull cakelets were as evenly coated as possible but thin enough for the face to show through.

These creepy quickie skulls ended up sweet, delicious and easy to share. [also just a tad bit sticky]


I even saved a few to add to brunch with my parents.

10/5/11

Bridal Blossom Cake

Currently the date is October 29th 2012 and I'm in the midst of hunkering down for the arrival of hurricane Sandy in Queens. This leaves the perfect opportunity to catch up on a year's worth of blogging. As you'll notice by the date on this post being October 5th 2011, I'm going to keep the post dates closer to their actual creation dates in order to keep things organized and in chronological order.

It's hard to recall the details from a year ago, but here goes...

This cherry blossom cake was made for a co-worker's office bridal shower.

I was happy with the chance to use a new Wilton fondant mold I bought with no intended end use. [I do that a lot - and I still want to buy more]

 The mold was super easy to use since it's made of a flexible silicone material. I made the blossoms, birds, leaves and floral borders from colored fondant and attached them to a white-fondant-covered square cake. I can't even remember the flavor of the cake... most likely chocolate cake with vanilla buttercream?

I used dark chocolate fondant to make the cherry blossom branches. They would have been easy to create rolling them out by hand but I ended up using the mold for those too just to try it out. Pretty simple either way.

I dusted the pink cherry blossoms and floral border with luster dust and topped them off with some white sugar pearls.

10/3/11

Pint O'Guinness Cake

The following birthday cake was a joint effort between my roommate and I. She baked many delicious chocolate Guinness cakes and whipped up batches of irresistible Bailey's icing while I figured out how to assemble it all into a stellar pint of Guinness.

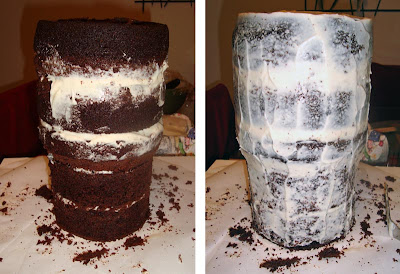
I started on a sturdy piece of white foam-core board, stacking two 6" round cakes and securing them with skewers.

I cut a circle from cardboard, covered it with foil and sat it atop the first 2 cake layers to add support for the remaining layers. I stuck a large dowel through the entire center of the cake (into the foam-core board as well) and shimmied on the next 6" layer.

After adding the last 3 layers, I used a serrated knife to start carving a pint glass shape.
Note: I put pieces of parchment paper around the base of the cake for easy clean-up.

I should have printed a photo of a pint glass or used and actual glass to get a more realistic figure but tapering the base seemed to create an acceptable shape. I lightly slathered on some icing - since this wasn't a stable buttercream I didn't want to lay it on too thick for fear of the fondant sliding off.

I opted to wrap the "pint glass" with dark chocolate fondant rather than try and cover this tall of a cake the traditional way. You'll notice my sloppy seam in the back... shhhh... don't look!

I used the same wrap-method with white fondant to mimic the frothy stout. I got a little overzealous and gave too much head... to this pint of Guinness. [Actually... the real reason is that I ran out of dark chocolate fondant and I needed to make up the rest of the space.]

The top of the pint was left fondant-free, instead topped with a thick layer of creamy icing. I added a smiley face for good measure as my roommate and I have done to the birthday boy's beer many a late night at the local watering holes. I used fondant cutters to create the birthday message and the Cricut machine to cut the "Guinness" lettering.

Tah-dah! The perfect pint... almost!

We transported the cake to a bar via a very cautious cab ride and I'm still traumatized by all the hands that touched the "finger-licking-good" icing while we patiently waited for the rest of the party to arrive. Let's just say the head did not hold it's structural integrity for very long.